- Posts: 105
- Thank you received: 29
Custom built ski
- Rossb
- Topic Author
- Visitor
7 years 3 months ago #33861
by Rossb
Custom built ski was created by Rossb
Hi
Some of you might remember 8 or so months ago I posted 5 videos on my channel in which I describe the repairs I made to a Fenn Mako XT ski. In the first of these I showed some brief footage of a custom built timber ski.In this new video I demonstrate another new ski, based on the same design but with a few mod's that make it a little lighter.
I also catch a few rides with the repaired XT and prove what we all knew - its a great board. But - no surprise - I like mine better!
Please Log in or Create an account to join the conversation.
7 years 3 months ago #33862
by manta
Replied by manta on topic Custom built ski
Those are some nice long rides!
Please Log in or Create an account to join the conversation.
7 years 3 months ago #33864
by Watto
Replied by Watto on topic Custom built ski
Absolutely outstanding footage , world class video from Albatross Aerial and music choice. Ballsy too getting onto and staying with some of those runs. Love your style getting out there, very motivating having come a cropper on big ones and consequences of going wrong way or staying on too long - winced a bit there waiting for one to close out and drill you. Thanks.
Please Log in or Create an account to join the conversation.
7 years 3 months ago #33868
by Impala
Replied by Impala on topic Custom built ski
Hi Ross,
very nice low-volume ski, interesting! Would you share a foto album about the building process? Is it your own design? How did you solve the cockpit problem?
very nice low-volume ski, interesting! Would you share a foto album about the building process? Is it your own design? How did you solve the cockpit problem?
Please Log in or Create an account to join the conversation.
- Rossb
- Topic Author
- Visitor
7 years 3 months ago #33871
by Rossb
Replied by Rossb on topic Custom built ski
Hi Impala
I'll be off the grid for about 10 days and will try to answer your questions when I get back.
Ross
I'll be off the grid for about 10 days and will try to answer your questions when I get back.
Ross
Please Log in or Create an account to join the conversation.
- Rossb
- Topic Author
- Visitor
7 years 1 month ago #34247
by Rossb
Replied by Rossb on topic Custom built ski
Hi Impala
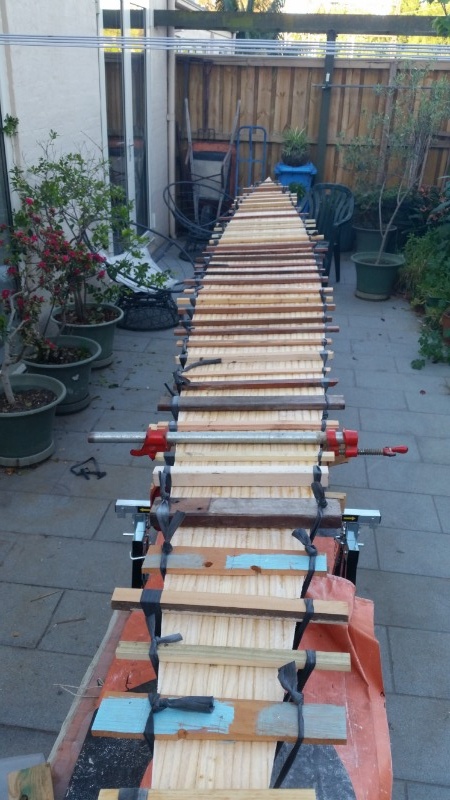
Sorry it took so long. I discovered that I didn't take as many pics as I thought but I have attached some pics below that show the bare process. The basic steps can be described as:
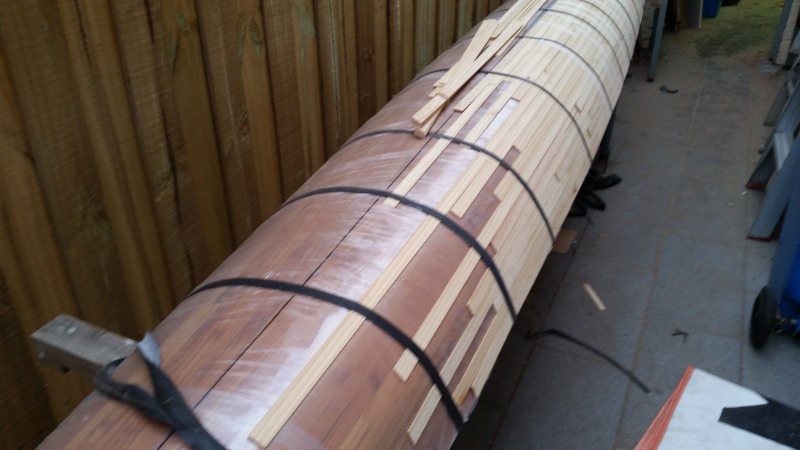
1. cutting strips as long as possible, as straight as possible, from timber as light as possible.
2. laying the strips end to end and side by side as shown in the first pic pulling the edges together as tight as possible and keeping them in place with masking tape and tight rubber bands made from bike inner tubes. All of it done on a previously prepared mold.
 . When its done it looks like the next pic
 .
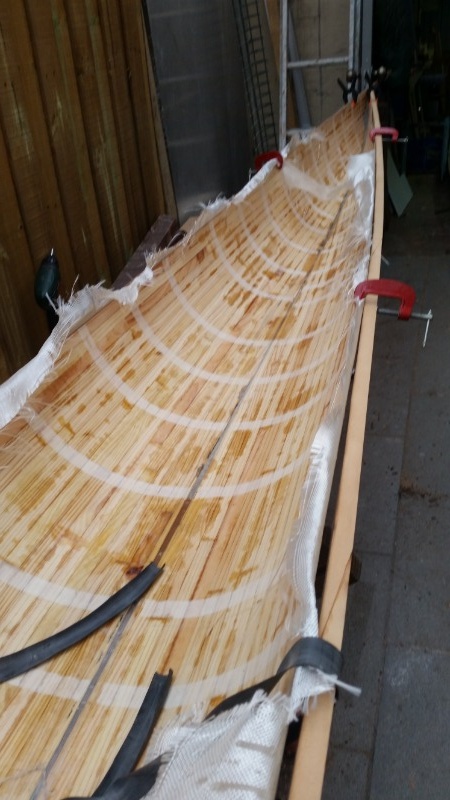
.
3. Then the whole thing is turned inside out [so the masking tape is on the inside], fitted back on the mold and sheathed with 200gsm fibreglass and epoxy resin.
4. To prevent the shape from sagging rails are cut and fitted temporarily to the outside as shown in the next pic. The rails eventually end up secured to the inside top edges of the hull to support the deck.
 .
.
5. The masking tape is removed and the inside is sheathed in fibreglass with foam ribs underneath as per next pic . The longitudinal blocks are not necessary and were fitted here because I wanted to experiment with fins.
 .
.
6. A box for the rudder shaft is fitted about 50-80cm from the tail - no pic.
7. The deck is done the same way as the hull but on a flat surface. Glassed both sides with foam ribs on the inside and cut to the approximate size.
 .
.
8. After the rails are secured to the top inside edge of the hull, their top sides are sanded, coated with epoxy adhesive and the deck lowered into place and secured with multiple wooden clamps held in place with rubber bands as per the next pic.
 .
.
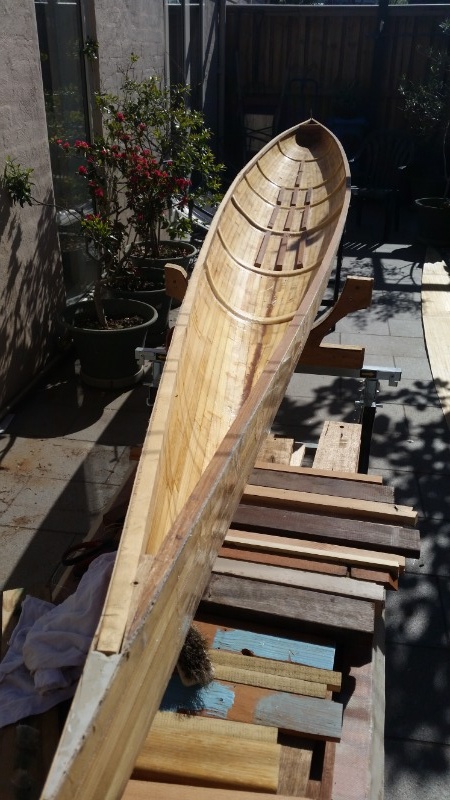
9. I had originally thought I would make the seat and feet separate parts but this became too difficult so I opted for a one piece custom built fibreglass cockpit of my own design and mold but made by a pro and secured to the deck with epoxy adhesive and s/s screws with a wooden frame around the edge. The next pic shows the large hole cut in the deck, the blocks for the 2 venturi drain holes and if you look closely under the front edge of the hole you'll see the blocks in place that anchor the screws.
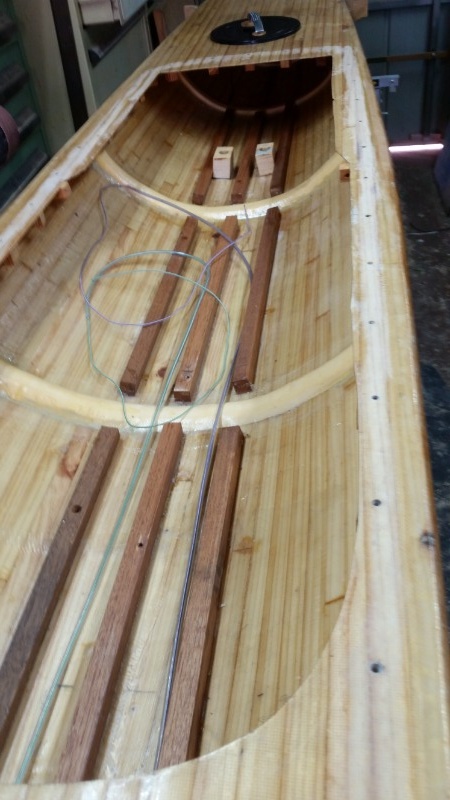
10. The completed foot well is shown in the next pic with some dummy pedals
 .
.
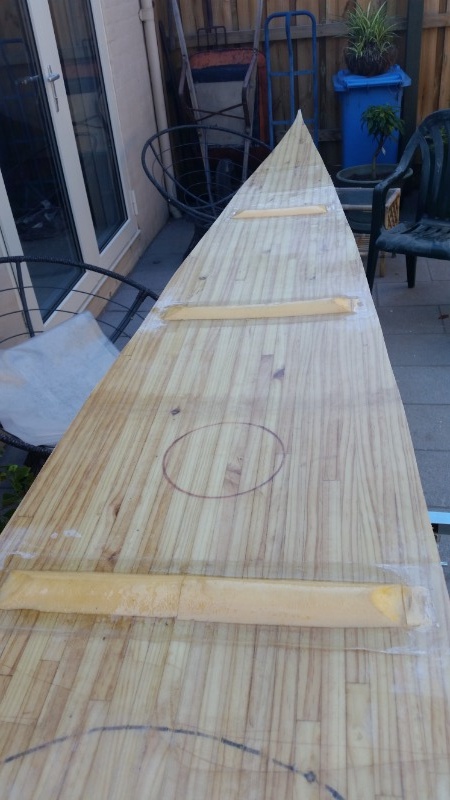
11. The cockpit is fitted with the frame for the pedal support and the channels for the pedal wires. These are inserted into tubes epoxied to the cockpit and exit through similar tubes at the rear to join with the rudder bar. When these are in place, the cockpit is secured to the deck with epoxy adhesive and screws. At the same time the bottom of the foot well is coated with expoy adhesive and when the cockpit is lowered into the deck hole it mates with the venturi blocks mentioned in step 9. At the same time 16mm PVC conduit is inserted through holes in the cockpit floor, into the venturi blocks and out the other side where they are cut flush with the hull when the resin cures.
And that's it.
Sorry it took so long. I discovered that I didn't take as many pics as I thought but I have attached some pics below that show the bare process. The basic steps can be described as:
1. cutting strips as long as possible, as straight as possible, from timber as light as possible.
2. laying the strips end to end and side by side as shown in the first pic pulling the edges together as tight as possible and keeping them in place with masking tape and tight rubber bands made from bike inner tubes. All of it done on a previously prepared mold.
3. Then the whole thing is turned inside out [so the masking tape is on the inside], fitted back on the mold and sheathed with 200gsm fibreglass and epoxy resin.
4. To prevent the shape from sagging rails are cut and fitted temporarily to the outside as shown in the next pic. The rails eventually end up secured to the inside top edges of the hull to support the deck.
5. The masking tape is removed and the inside is sheathed in fibreglass with foam ribs underneath as per next pic . The longitudinal blocks are not necessary and were fitted here because I wanted to experiment with fins.
6. A box for the rudder shaft is fitted about 50-80cm from the tail - no pic.
7. The deck is done the same way as the hull but on a flat surface. Glassed both sides with foam ribs on the inside and cut to the approximate size.
8. After the rails are secured to the top inside edge of the hull, their top sides are sanded, coated with epoxy adhesive and the deck lowered into place and secured with multiple wooden clamps held in place with rubber bands as per the next pic.
9. I had originally thought I would make the seat and feet separate parts but this became too difficult so I opted for a one piece custom built fibreglass cockpit of my own design and mold but made by a pro and secured to the deck with epoxy adhesive and s/s screws with a wooden frame around the edge. The next pic shows the large hole cut in the deck, the blocks for the 2 venturi drain holes and if you look closely under the front edge of the hole you'll see the blocks in place that anchor the screws.
10. The completed foot well is shown in the next pic with some dummy pedals
11. The cockpit is fitted with the frame for the pedal support and the channels for the pedal wires. These are inserted into tubes epoxied to the cockpit and exit through similar tubes at the rear to join with the rudder bar. When these are in place, the cockpit is secured to the deck with epoxy adhesive and screws. At the same time the bottom of the foot well is coated with expoy adhesive and when the cockpit is lowered into the deck hole it mates with the venturi blocks mentioned in step 9. At the same time 16mm PVC conduit is inserted through holes in the cockpit floor, into the venturi blocks and out the other side where they are cut flush with the hull when the resin cures.
And that's it.
Please Log in or Create an account to join the conversation.
- MCImes
- Visitor
7 years 1 month ago #34250
by MCImes
Replied by MCImes on topic Custom built ski
Beautiful craftsmanship Ross. That is an impressive build!
Thanks for sharing
Thanks for sharing
Please Log in or Create an account to join the conversation.
7 years 1 month ago #34266
by paddlepop
Replied by paddlepop on topic Custom built ski
well, that looks pretty easy, i might build one next weekend
Please Log in or Create an account to join the conversation.
Latest Forum Topics
-
- Gorge Downwind Champs Beginner
- 10 hours 21 minutes ago
-
- Where did everybody go?
- 1 day 13 hours ago
-
- anyone use a wrist secured paddle leash ?
- 1 day 13 hours ago