- Posts: 20
- Thank you received: 2
Query about tape line and epoxy
Please Log in or Create an account to join the conversation.
Please Log in or Create an account to join the conversation.
My initial idea was a thin coat just on the bottom and having the tape line taped off. I never thinned epoxy which I am shy about as I do not want to destroy the integrity/bonding. Ah well. We shall see. Cheers.
Please Log in or Create an account to join the conversation.
BTW, I have the strong feeling that you're trying to ruin your surfski more than anything else. If you're not having damage to your surfski then I'd leave the epoxy in the cabinet and spend the time in the surfski on the water paddling
Good luck!
Please Log in or Create an account to join the conversation.
I have some heart issues that have me a bit sidelined for a month or two (hopefully) which I have used this time to fix up this old ski. That is were I am at. I have my V14 to take out. Just not pushing the water as much.
Please Log in or Create an account to join the conversation.
Please Log in or Create an account to join the conversation.
First: Dry out your boat!
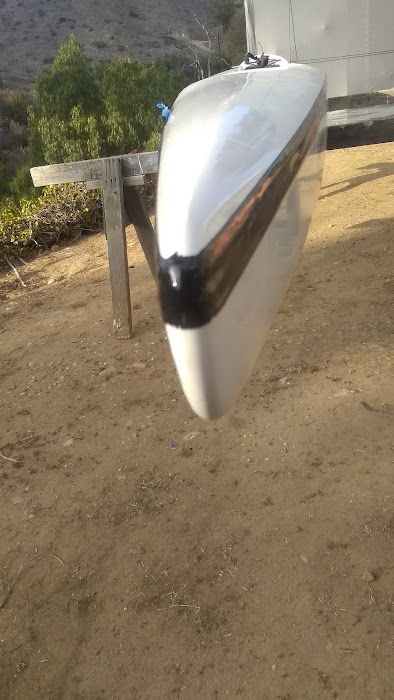
Second : Gather the necessary supplies for the repair, I am using a variety of composite products here: Due to the rigidity and and stiffness, I chose to use Carbon fiber tape (vs fibergass) that I had bought for repairs on my old ski. I thicken my epoxy with colloidal silica and colored it with black graphite powder that gives a nice smooth glossy finish and UV protection.
Third: Identify leaks. Some were pretty obvious due to salt crystals at leaks, but did leak test any way. Only want to do this once. Pressurize hull with your lungs and plug vent/drain etc. Spray hull and areas most likely to leak with soapy water.
Next: Clean areas to be patched with acetone. Double tape area and sand moderately. .
Here's where I skip typical steps, Cut carbon to fit inside taped area. You wont be able to see seam with black resin to cut with razor, which I ended up having to very carefully do anyway, but, not to much., Apply a thin coat of the slightly thickened epoxy to fill the uneven surface and apply carbon strip. Saturate carbon (or fiberglass) with epoxy, I use throw away brushes. Next, to avoid the typical sanding and finish coat. apply wax paper and thoroughly smooth with dry brush then squeeze out excess resin with your hands. I actually created a vacuum by sucking on the vent tube and plugging it to help draw resin into the seam.
Let it dry, BUT, not fully cure. About an hour and a half or two in the sun with regular cure or what is commonly referred to as slow cure. All relative. I some times use epoxy that takes 24 hours to cure. Have a fresh razor blade to assist with the tape and wax paper removal.
So it is not a perfect glossy finish repair, but, it is a stronger than new leak free repair and gets you back in the water in one day.
Of course there are dozens of ways to make these types of repairs. This just what worked for me. Hope some one finds this useful.
Attachments:
Please Log in or Create an account to join the conversation.
I was just recently introduced to the use of gasoline to remove adhesive residue by a guy from Mexico who did upholstery work on my boat. That was the MAGIC elixir. Easily removed the glue, shined and polished the ski and best of all! Did not damage the factory stickers like acetone does. Just wish I had discovered this 50 years ago. Would have greatly improved my many life's projects frustrations.
Please Log in or Create an account to join the conversation.
- MCImes
- Visitor
You got it looking good! Good tip about gasoline. Ive neve tried it but seems like it should be a hotter version of paint thinner
Please Log in or Create an account to join the conversation.
Please Log in or Create an account to join the conversation.
Please Log in or Create an account to join the conversation.
Please Log in or Create an account to join the conversation.
Ranga would know much more than I. Good luck!
Please Log in or Create an account to join the conversation.
Lightly sand the hull but not too much as to damage the carbon. Then using a plastic squeegee, just drag the epoxy over the hull as hard as you can to give it a very thin coating. I usually drag over it with my hand palm down to remove the slight ridges at the end. leave to go hard, you will have a decent finish doing that and it will seal and pinholes.
Please Log in or Create an account to join the conversation.
The reason I wanted to coat it is that the carbon was exposed (center section of each weave overlap was carbon). It is supposedly a G2 from 2013. I'll ask Epic what the process was then. I do not know if the clear coated or epoxied.
I masked the tape line but left room for the epoxy to saturate under the tape line since it is gapping in areas.
She'll be on the water tonight or tomorrow. The top will get done later. Ought to be much less pressure because I can do it in two small batches.
Attachments:
Please Log in or Create an account to join the conversation.
Latest Forum Topics
-
- Has anyone actually paddled a Fennix Bluefin S?
- 1 day 4 hours ago


