- Posts: 13
- Thank you received: 2
What's the best way to fix this...?
Less
More
7 years 3 months ago #33910
by fitz
What's the best way to fix this...? was created by fitz
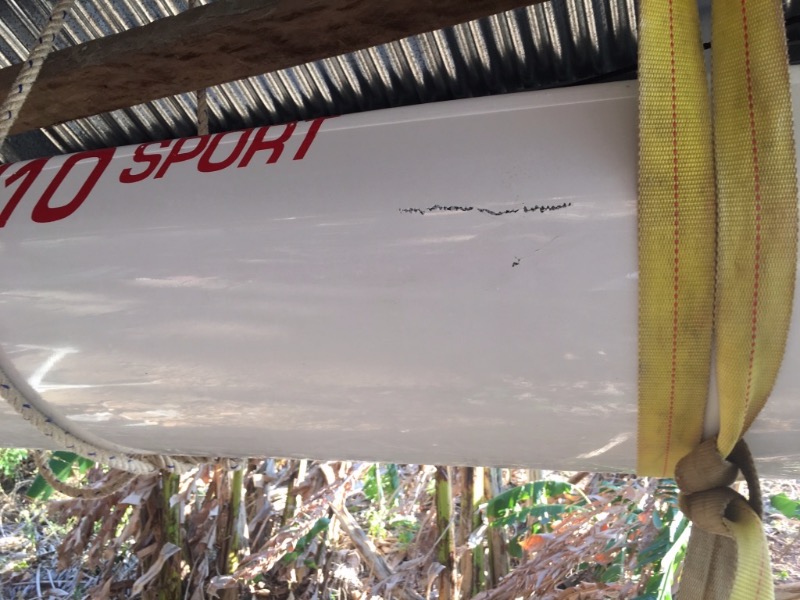
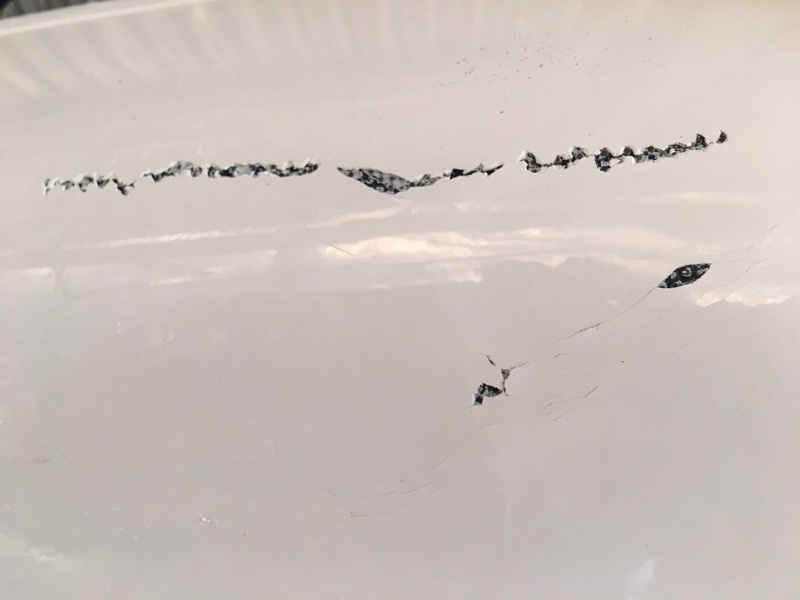
I damaged my surfski 6 months ago but no water comes in and have been using it twice weekly ever since. See the 2 pics below which loaded upside down. The damaged section is is about 14cm long. How should I fix it? Thanks
[img]blob:https://www.surfski.info/739f1f83-0b9d-4d35-a1bd-e400bb92441a[/img]
[img]blob:https://www.surfski.info/12f4ba65-7584-4155-bc4d-70d8e1fe80e4[/img]
[img]blob:https://www.surfski.info/739f1f83-0b9d-4d35-a1bd-e400bb92441a[/img]
[img]blob:https://www.surfski.info/12f4ba65-7584-4155-bc4d-70d8e1fe80e4[/img]
Please Log in or Create an account to join the conversation.
Less
More
- Posts: 13
- Thank you received: 2
7 years 3 months ago - 7 years 3 months ago #33911
by fitz
Replied by fitz on topic What's the best way to fix this...?
Sorry, the pics are below (I hope).
Last edit: 7 years 3 months ago by [email protected]. Reason: Inserted images into message
Please Log in or Create an account to join the conversation.
7 years 3 months ago #33912
by Fath2o
Replied by Fath2o on topic What's the best way to fix this...?
I have some questions to start. How do you want this repair to look when done? How much time , energy and funds due you want put into this project? Are you at all familiar with this kind of repair and due you already have supplies and tools?
Functionally it is a relatively simple repair. Cosmetically the repair gets a little trickier.
It is much simpler repair when you already have some supplies in your tool chest. Can get a little tedious collecting all the supplies, usually much more than you need, and can be a bit of an investment. No problem if you plan on doing more such repairs in the future. The simpler approach is to sand the area, I like using a Porter Cable orbital sander with 80 -120 grit paper. Oh, should clean the area with Acetone or equivalent first. Epoxy a 2-3 layers of fiberglass overlapping cracked area a bit. Sand it all down. Apply a fill coat of slightly thickened ( West System 410 for example) and easily sandable epoxy. lightly sand smooth. Finish with can of white spray paint. Not real pretty, but, works. I'm sure others will chime in here with many other options and suggestions.
There are many ways to do this repair and the best one is the one that works for you. Good luck with it.
Please Log in or Create an account to join the conversation.
7 years 3 months ago #33913
by Ranga
Replied by Ranga on topic What's the best way to fix this...?
Get some Luer Lock syringes ( they lock onto the syringe) and 18G x 1.5 needles, any pharmacy should have them. Epoxy resin, the runnier the better.
- Drill 2mm holes into the outer layer of the hull ( 1mm deep), do not drill through both layers of the hull. Holes aprox 50mm apart where it is soft.
- With a dry needle and syringe insert needle into holes drilled at an angle so as to join up the holes you drilled under the gel coat and first carbon layer, I usually bend the needle slightly to help to get the angle, essentially pocketing out the Nomex honeycomb, creating resin channels.
- Mix resin and with new needle inject into the holes slowly. Starting at one edge of the damage. As one hole fills with resin to join with another block first hole with clear packing tape and then proceed to second hole and so on. Make sure surrounding area is clean and free from resin otherwise tape will not stick, use long pieces of tape stuck on cross ways.
- When cured, remove tape. That will be good enough to just lightly sand excess resin away and be done with. To get a 100% finish is a harder job, requires a bit more skill as the colour is not white. A good car spray painter should be able to match paint or an even better composite repairer can do it in Gelcoat which is what the outer layer of the ski is made with.
The following user(s) said Thank You: Fath2o
Please Log in or Create an account to join the conversation.
7 years 3 months ago #33914
by PSwitzer
Replied by PSwitzer on topic What's the best way to fix this...?
With a fairly new boat where resale value is a concern I would go with the Fath2o method since I'm familiar with it. Ranga's syringe method sounds pretty slick, I like the idea of filling it in from the inside out, however would want to see a video or someone do it in person since it's kind of hard to visualize.
I get gelcoat damage like that frequently on my decade old beater boat, i just pick off the loose gelcoat chips with my fingernail, give a few sweeps by hand with 100 grit sandpaper and a block, then paint on some fingernail polish or epoxy depending on the size. if the edges of the epoxy cure too rough for my liking just sand it till it's reasonable. Total time for a repair that size around 10 min total work. If you deal with this type of thing sooner rather than later, water will wick under the gelcoat and it will start flaking off in bigger pieces so less work if caught early.
If the layup is actually breached with a crack that is visible or lets water through, that's a different story and would need to lay some cloth on there for strength.
The following user(s) said Thank You: Fath2o
Please Log in or Create an account to join the conversation.
7 years 3 months ago #33915
by Ranga
Replied by Ranga on topic What's the best way to fix this...?
Just a note, I do this for a living.
You cannot crack the gelcoat without damaging the sub-straight (Nomex Honeycomb). The reason it is not leaking is because the inner Kevlar layer has not been breached, however I guarantee the whole area will be soft and have no structure and the Nomex will be full of water.
Yes if the area in question was structural damage, caused by use on the water, I would definitely repair with external reinforcing. This damage however looks like impact and not structural.
Just fixing the gelcoat will never work as you have failed to secure the sub-straight it will just crack again because it is still soft underneath. The gelcoat is not coming off by magic, it has been hit hard, this gelcoat cannot bend much it is high quality and baked in an oven and does not like to bend at all. Hence the gelcoat on the Club construction Epic skis is different (more flexible) because the ski has more flex than the honeycomb sandwich constructions.
Please Log in or Create an account to join the conversation.
Less
More
- Posts: 13
- Thank you received: 2
7 years 3 months ago #33923
by fitz
Replied by fitz on topic What's the best way to fix this...?
Thank you very much for the great advice. Will try the syringe method.
Please Log in or Create an account to join the conversation.
7 years 2 months ago - 7 years 2 months ago #33966
by Fath2o
Replied by Fath2o on topic What's the best way to fix this...?
As Ranga , an expert surfski repairman, has illustrated there is more than one way to accomplish this structural repair. But as he posted the cosmetic repair can be a bit more complicated. As he posted "To get a 100% finish is a harder job, requires a bit more skill as the colour is not white," The final finish is definitely the most delicate and difficult step to accomplish a perfect repair job. White spray paint is easy , but, does not match the original finish and no where near as durable as gel coat. Just a matter of what you are comfortable with. (and how much you are willing to spend $$$).
The method I previously described will probably add more weight to your ski than Ranga's method too!
The method I previously described will probably add more weight to your ski than Ranga's method too!
Last edit: 7 years 2 months ago by Fath2o.
Please Log in or Create an account to join the conversation.
6 years 1 month ago #36685
by tve
Replied by tve on topic What's the best way to fix this...?
Shit happens. Bought lightly used surfski. Left it in the wrong place overnight while setting it up. Wind... Tears... Kick self in butt... More tears...
I ended up with a 4"x5" "soft spot" with a small 1/2" penetration of the gelcoat. This is an Epic Ultra ski, i.e., carbon-kevlar.
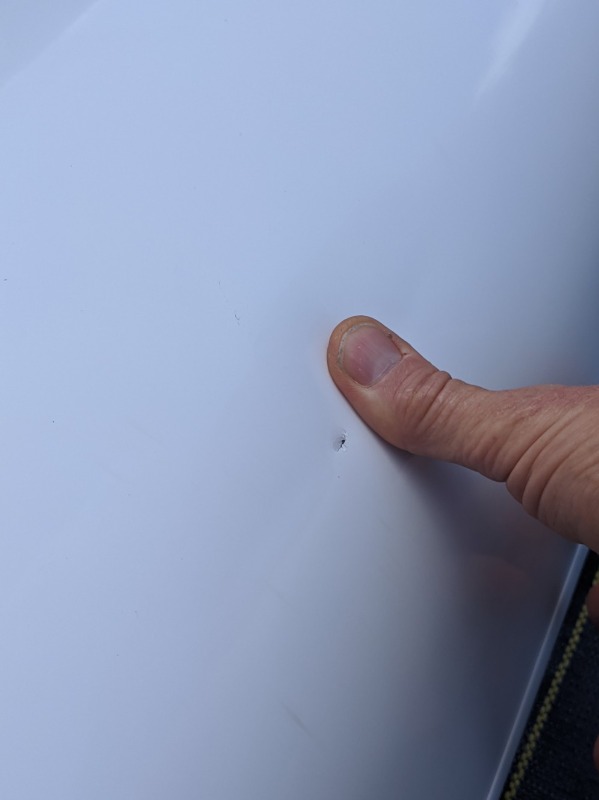
Next step was "where was that post to which Ranga replied a few months ago?" I ordered syringes, needles, epoxy. Then waited a week to build courage and in the meantime covered the gelcoat penetration with tape and continued to surfski.
Finally the day came... I prepped a drill bit with depth stop:
And covered the area with holes reaching beyond the soft area:
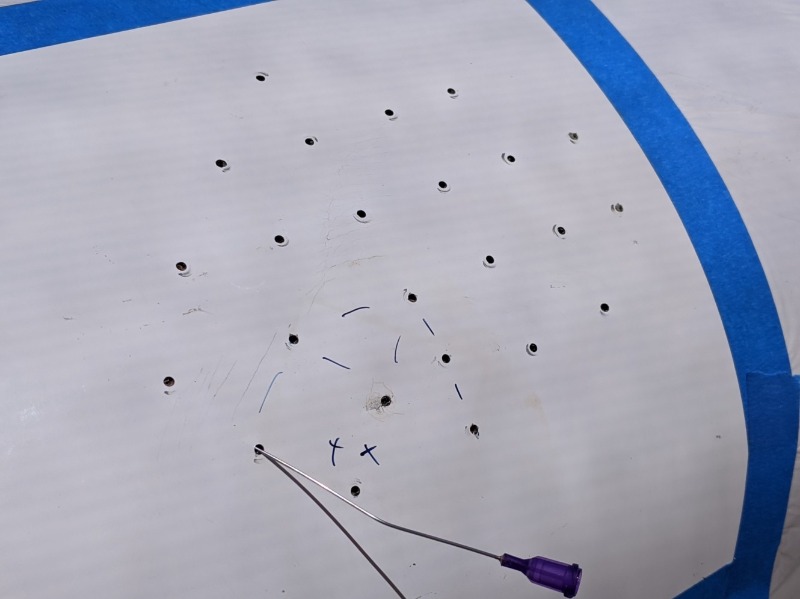
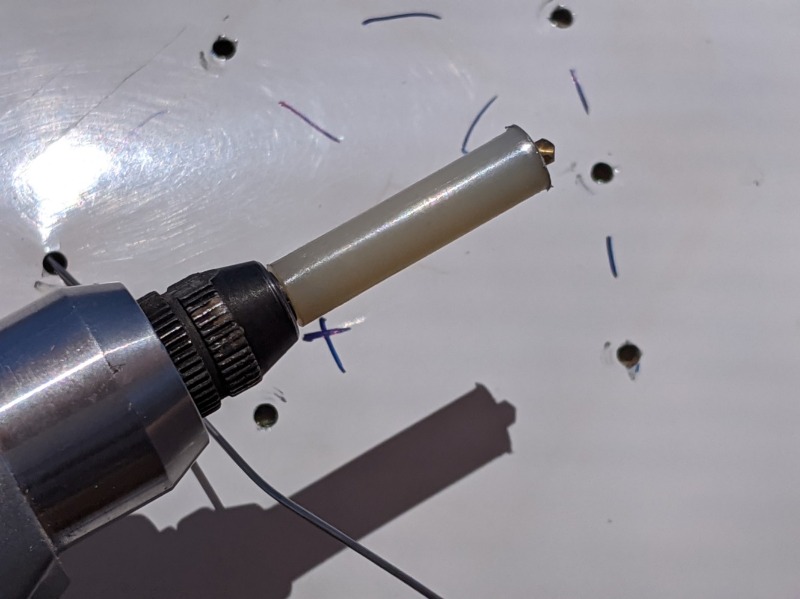
The most confusing thing overall for me was to try and understand how thick the honeycomb is and whether I was poking through some hard honeycomb rib, through the kevlar inner layer, or hitting the bent-up needle against some carbon fibers of the inside of the outer layer. Here's a successful channel with needle visible at other end:
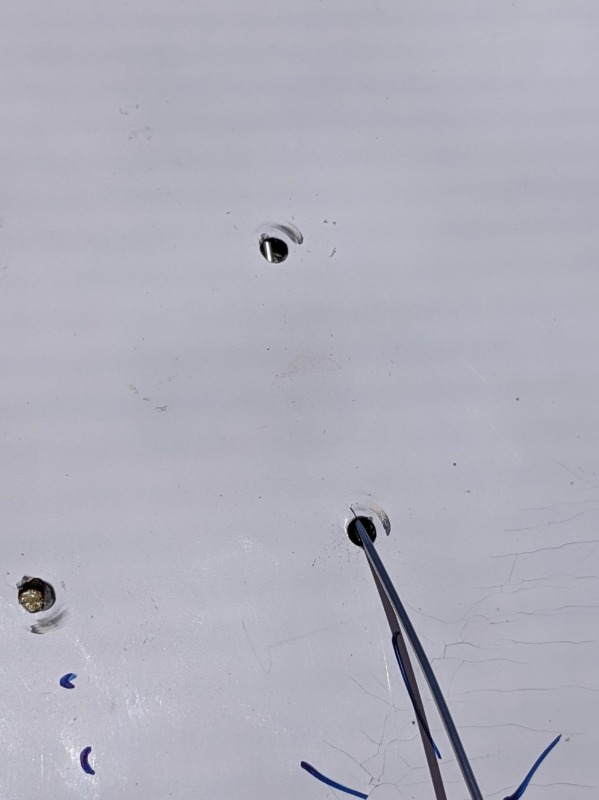
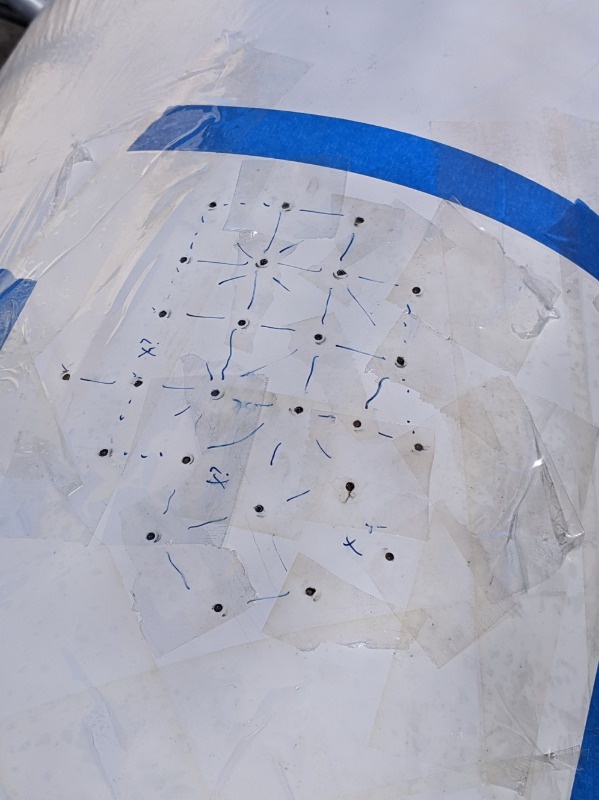
In most cases I couldn't get a clear visual like this and either I didn't dare poking the needle all the way to the next hole or I missed the hole. In some cases I'm pretty sure I poked through the kevlar because all resistance ended and I could insert the needle all the way. Ooops!! In some of these cases this happened without any resistance, so I assume the inner skin was already breached, dunno. I ended up marking the channels I made: solid for good ones, dotted when I couldn't get very far, and X when it seemed I had gone through the inner skin:
Setting everything up, gathering materials, drilling and poking took me about two hours. In the end, this is how it looked, ready for epoxy injection:

To inject the epoxy I ended up using a short needle (1/2") somewhat bent. Overall the injection was easier than I expected. The only hitch is that at one point I heard tock, tock, tock, ... Took me 2 seconds, but then the lightbulb went on: epoxy dripping on the inside, ooops! I stopped injecting into that hole and moved elsewhere. Overall I believe I used about 15cc-20cc but I don't know for sure. The injection took maybe half an hour. In the end, this is how it looked:
I then waited a few hours for the epoxy to semi-harden (I used very slow hardener) and peeled off the tape. Epoxy had oozed out in a few places. It's hard to get the tape on securely 'cause you don't want to press on the soft spot since that pushes epoxy out... I shaved the extra epoxy off with a razor blade, which worked very well.
The next day with the epoxy hard but not yet fully cured the area feels as hard as the same spot on the other side of the ski, so I'm hopeful. This is how it looks now:
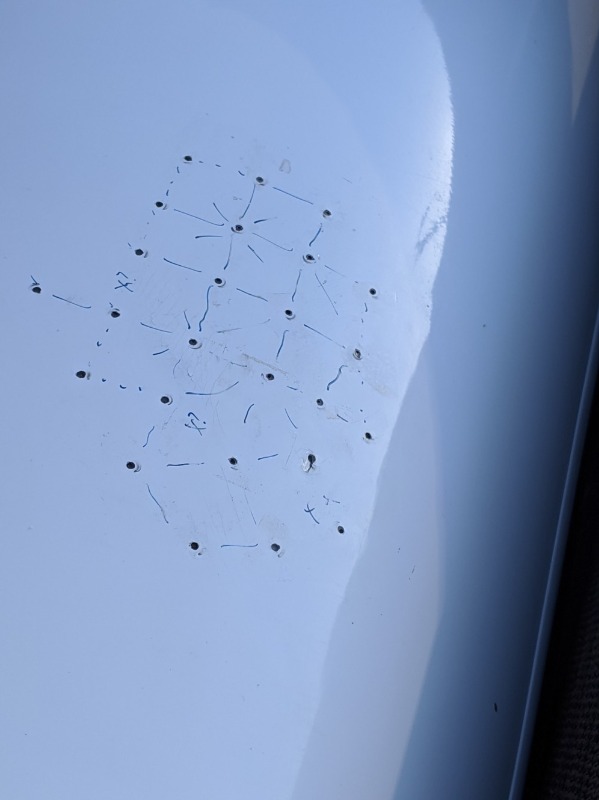
Some of the holes are dimpled and the original gelcoat penetration is also a bit sunken. I suppose I'll fill those areas with a bit more epoxy to bring them to level. Overall everything is pretty smooth and I hope just fine sanding will be sufficient until I find the courage to deal with the gelcoat.
Overall, given that this is the first time I've dealt with anything like that I'm pretty happy so far. I figure that if some spot is not yet hard enough I can always drill a few more holes and fill some more... Some of the lesson learned:
- I'm still unclear about the overall thickness of the assembly, I believe it's under 4mm total thickness, but I'm not sure. I wish I could have ordered a 5cmx5cm piece of scrap skin from epic to examine the thing and practice on. Of course for a pro this is a triviality. For me the poking channels remained a mystery throughout.
- I used the TotalBoat Traditional Epoxy 5:1 kit with the slow hardener. I only used one pump press. If I were to do it again, I would get the fast hardener because I found that the injecting goes a lot faster than I thought. Dunno.
- I used a 4" long 21ga needle to poke the channels. I had a bunch of 4" 18ga needles and they were too thick to get through the holes at an angle. I bent the tip of the needle and held that up trying to avoid going through the kevlar. The 4" are too long in a way, except that when I used the short one to inject I realized that it rotates in the plastic connector sleeve while I could hold the long needle much more steady by grabbing it on the metal part. 2" would probably be ideal (I think that's what Ranga recommended, but I couldn't get any).
- I believe I used a 22 ga needle (quite bent to curve into the holes) with a 5cc syringe to inject, but now I'm not sure about the gauge. I had ordered an assortment and ended up using only two needles overall.
- I was bummed to see the oozed out epoxy when I first took the tape off, but it was really easy to shave off in that semi-hard state. Now I'm more bummed about the holes that have dimples. Not sure what to think, maybe having more oozing is better?
- On the drill bit a solid depth stop is absolutely necessary. There is no way to hand-hold that. I had some depth stop collets but couldn't convince myself that they would hold. I used a nylon spacer, put some hot glue inside, and adjusted everything so the nylon sat right against the chuck with the drill bit poking out just enough. All you need is for the shoulder of the drill bit tip to show up past the nylon.
OK, that's the adventure of this total repair newbie thus far. I'm sure the pros will chuckle and point out my mistakes (please do!). I'm posting this in case it helps someone else here...
I'm somewhat divided between being happy to be able to do this myself and wishing I could have just showed up with surfski and credit card at some pro's shop. Alas that wasn't a good option with covid-19 and no-one doing that kind of repair in the area.
If the boat sinks the next time I go out I'll sing a different tune, haha!
I ended up with a 4"x5" "soft spot" with a small 1/2" penetration of the gelcoat. This is an Epic Ultra ski, i.e., carbon-kevlar.
Next step was "where was that post to which Ranga replied a few months ago?" I ordered syringes, needles, epoxy. Then waited a week to build courage and in the meantime covered the gelcoat penetration with tape and continued to surfski.
Finally the day came... I prepped a drill bit with depth stop:
And covered the area with holes reaching beyond the soft area:
The most confusing thing overall for me was to try and understand how thick the honeycomb is and whether I was poking through some hard honeycomb rib, through the kevlar inner layer, or hitting the bent-up needle against some carbon fibers of the inside of the outer layer. Here's a successful channel with needle visible at other end:
In most cases I couldn't get a clear visual like this and either I didn't dare poking the needle all the way to the next hole or I missed the hole. In some cases I'm pretty sure I poked through the kevlar because all resistance ended and I could insert the needle all the way. Ooops!! In some of these cases this happened without any resistance, so I assume the inner skin was already breached, dunno. I ended up marking the channels I made: solid for good ones, dotted when I couldn't get very far, and X when it seemed I had gone through the inner skin:
Setting everything up, gathering materials, drilling and poking took me about two hours. In the end, this is how it looked, ready for epoxy injection:
To inject the epoxy I ended up using a short needle (1/2") somewhat bent. Overall the injection was easier than I expected. The only hitch is that at one point I heard tock, tock, tock, ... Took me 2 seconds, but then the lightbulb went on: epoxy dripping on the inside, ooops! I stopped injecting into that hole and moved elsewhere. Overall I believe I used about 15cc-20cc but I don't know for sure. The injection took maybe half an hour. In the end, this is how it looked:
I then waited a few hours for the epoxy to semi-harden (I used very slow hardener) and peeled off the tape. Epoxy had oozed out in a few places. It's hard to get the tape on securely 'cause you don't want to press on the soft spot since that pushes epoxy out... I shaved the extra epoxy off with a razor blade, which worked very well.
The next day with the epoxy hard but not yet fully cured the area feels as hard as the same spot on the other side of the ski, so I'm hopeful. This is how it looks now:
Some of the holes are dimpled and the original gelcoat penetration is also a bit sunken. I suppose I'll fill those areas with a bit more epoxy to bring them to level. Overall everything is pretty smooth and I hope just fine sanding will be sufficient until I find the courage to deal with the gelcoat.
Overall, given that this is the first time I've dealt with anything like that I'm pretty happy so far. I figure that if some spot is not yet hard enough I can always drill a few more holes and fill some more... Some of the lesson learned:
- I'm still unclear about the overall thickness of the assembly, I believe it's under 4mm total thickness, but I'm not sure. I wish I could have ordered a 5cmx5cm piece of scrap skin from epic to examine the thing and practice on. Of course for a pro this is a triviality. For me the poking channels remained a mystery throughout.
- I used the TotalBoat Traditional Epoxy 5:1 kit with the slow hardener. I only used one pump press. If I were to do it again, I would get the fast hardener because I found that the injecting goes a lot faster than I thought. Dunno.
- I used a 4" long 21ga needle to poke the channels. I had a bunch of 4" 18ga needles and they were too thick to get through the holes at an angle. I bent the tip of the needle and held that up trying to avoid going through the kevlar. The 4" are too long in a way, except that when I used the short one to inject I realized that it rotates in the plastic connector sleeve while I could hold the long needle much more steady by grabbing it on the metal part. 2" would probably be ideal (I think that's what Ranga recommended, but I couldn't get any).
- I believe I used a 22 ga needle (quite bent to curve into the holes) with a 5cc syringe to inject, but now I'm not sure about the gauge. I had ordered an assortment and ended up using only two needles overall.
- I was bummed to see the oozed out epoxy when I first took the tape off, but it was really easy to shave off in that semi-hard state. Now I'm more bummed about the holes that have dimples. Not sure what to think, maybe having more oozing is better?
- On the drill bit a solid depth stop is absolutely necessary. There is no way to hand-hold that. I had some depth stop collets but couldn't convince myself that they would hold. I used a nylon spacer, put some hot glue inside, and adjusted everything so the nylon sat right against the chuck with the drill bit poking out just enough. All you need is for the shoulder of the drill bit tip to show up past the nylon.
OK, that's the adventure of this total repair newbie thus far. I'm sure the pros will chuckle and point out my mistakes (please do!). I'm posting this in case it helps someone else here...
I'm somewhat divided between being happy to be able to do this myself and wishing I could have just showed up with surfski and credit card at some pro's shop. Alas that wasn't a good option with covid-19 and no-one doing that kind of repair in the area.
If the boat sinks the next time I go out I'll sing a different tune, haha!
Please Log in or Create an account to join the conversation.
- [email protected]
-

- Offline
- Admin
Less
More
- Posts: 1841
- Thank you received: 411
6 years 1 month ago #36686
by [email protected]
Rob
Currently Epic V10 Elite, Epic V10 Double.
Previously: Swordfish S, Evo II, Carbonology Zest, Fenn Swordfish, Epic V10, Fenn Elite, Red7 Surf70 Pro, Epic V10 Sport, Genius Blu, Kayak Centre Zeplin, Fenn Mako6, Custom Kayaks ICON, Brian's Kayaks Molokai, Brian's Kayaks Wedge and several others...
Replied by [email protected] on topic What's the best way to fix this...?
Well done! Thanks for posting this...
Rob
Currently Epic V10 Elite, Epic V10 Double.
Previously: Swordfish S, Evo II, Carbonology Zest, Fenn Swordfish, Epic V10, Fenn Elite, Red7 Surf70 Pro, Epic V10 Sport, Genius Blu, Kayak Centre Zeplin, Fenn Mako6, Custom Kayaks ICON, Brian's Kayaks Molokai, Brian's Kayaks Wedge and several others...
Please Log in or Create an account to join the conversation.
6 years 1 month ago #36708
by mamaru
Replied by mamaru on topic What's the best way to fix this...?
@ tve: My deeply felt sympathies...
@ tve, @ Ranga: Ok, this is a very special situation since the most unfortunate accident happend on dry land.
Assumed this happened on the water, how do you get that out of the honeycomb again? And IF you decide to open the outer skin, how do you build it up again (never do that, solid, some kind of spacer?) Does anyone have any pictures to actually see the stucture of the material?
Please Log in or Create an account to join the conversation.
6 years 1 week ago #36903
by mamaru
Replied by mamaru on topic What's the best way to fix this...?
Time is running, didn't think this was so long ago already! Nevertheless I would like to repeat my questions since I have such a problem waiting for action, too:
As the incident happened on the water (hit an UFO), how do you get the water out of the honeycomb again? And IF you decide to open the outer skin, how do you build it up again (never do that, solid, some kind of spacer?) Does anyone have any pictures to actually see the stucture of the material?
All answers are very much appreciated!
Please Log in or Create an account to join the conversation.
6 years 1 week ago #36904
by tve
Replied by tve on topic What's the best way to fix this...?
I can't speak from experience with water inside, so apply healthy skepticism(!), I only have some simple suggestions:
- store the boat overnight in an orientation that lets the water come out of the puncture
- drill the holes and watch whether moisture comes out, again store overnight for it to drain
- make the channels for the resin and watch for moisture, use very low pressure compressed air to blow through the channels
- leave a space heater or similar source of low heat blowing on the area to soak in warmth for a few hours to get more moisture out
- others have suggested to flush with alcohol or similar rapidly evaporating liquid, I'm not sure I could bring myself to willingly add more moisture...
- inject resin into the channels, let it cure, test how solid it feels and be prepared to do a second round with some more channels if there are soft spots left
At the end of the day, if it doesn't work to your satisfaction you can still take sandpaper to the whole area, sand down the top layer and do the "traditional" type of fix.
Please Log in or Create an account to join the conversation.
Latest Forum Topics
-
- Gorge Downwind Champs Beginner
- 5 hours 58 minutes ago
-
- Where did everybody go?
- 4 days 17 hours ago
-
- anyone use a wrist secured paddle leash ?
- 4 days 17 hours ago